How to Set up and Use DocuVieware with React
Using React to Host DocuVieware
One of the most popular frameworks for building browser-based applications is React, and it’s the perfect vehicle for hosting DocuVieware.
In this article, we’ll show you how to set up and use DocuVieware in a web application using the React framework. As React is a front-end technology, we need a process to host it on a server and deploy it to the browser. To achieve this, we’ll use a .NET WebAPI application, which will also act as the server-side deployment host for the DocuVieware technology.
Setting Up the Project
The first step is to download and install the DocuVieware SDK, then install DocuVieware and the core GdPicture.NET package. When you’re done, you can start setting up the WebAPI application.
The easiest way to get a .NET WebAPI app up and running is to use the helpers built into Microsoft Visual Studio. In Visual Studio, start a new project and choose an ASP.NET application. Then select the empty template and ensure the Web API checkbox is ticked.
Note that DocuVieware uses version 4.6 of the .NET Framework, so be sure the project is set to use this.
Once you approve the default settings, Visual Studio takes care of building out the scaffolding required for this project.
After creating the project in Visual Studio, we need to add a number of required libraries.
In Solution Explorer, select the references section and import GdPicture.NET.14.WEB.DocuVieware.dll from the [INSTALLATION FOLDER]\Redist\DocuVieware (.NET Framework 4.6)\ folder. It’s important to mark this as Copy Local.
You also need to copy over the files needed for distribution, which are found in the [INSTALLATION FOLDER]\Redist\ folder. Select the DLLs relevant to the server you’re deploying on, 32- or 64-bit. The distribution libraries should be added to the references using the add command, not add link.
Finally, as with the core DLL, we need to set some build options, so set the "Build Action" property to "Content" and the "Copy to Output Directory" property to "Copy always" for each file. We’re now ready to configure the API.
Licensing the DocuVieware API
To use DocuVieware, you first need to set its license key. This is done in the Global.asax.cs file in the root folder of the application:
usingSystem;
usingSystem.Collections.Generic;
usingSystem.Linq;
usingSystem.Web;
usingSystem.Web.Http;
usingSystem.Web.Routing;
usingGdPicture14.WEB;
namespaceDocuViewareREST
{
  publicclassWebApiApplication:System.Web.HttpApplication
  {
    protectedvoidApplication_Start()
    {
      GlobalConfiguration.Configure(WebApiConfig.Register);
      DocuViewareManager.SetupConfiguration(true,DocuViewareSessionStateMode.InProc,
      HttpRuntime.AppDomainAppPath+"\\Cache");
      DocuViewareLicensing.RegisterKEY("0479351806789477867332464");
      DocuViewareEventsHandler.CustomAction+=CustomActionsDispatcher;
    }
  }
}
Setting the license consists of adding a reference to the core library (using GdPicture14.WEB) and passing in initial settings to let the library know where to store temporary cache files. You’ll find a great walk-through of the entire process on the DocuVieware website.
Implementing the Service
There are a number of different ways to implement the service, which are given in the DocuVieware documentation and website. For this example, to keep things simple we’ll focus on the React part of the project.
First, we need to create a test controller, which we’ll call DocuViewareRESTController. The purpose of the controller is to configure the default settings for the service, and to act as an endpoint to generate and transfer the service to the user in the browser. Here are the steps.
First, define the controller:
[HttpPost]
    [Route("api/DocuViewareREST/GetDocuViewareControl")]
    publicDocuViewareRESTOutputResponseGetDocuViewareControl(DocuViewareConfiguration
      controlConfiguration)
    {
      if(!DocuViewareManager.IsSessionAlive(controlConfiguration.SessionId))
      {
        if(!string.IsNullOrEmpty(controlConfiguration.SessionId) &&
          !string.IsNullOrEmpty(controlConfiguration.ControlId))
        {
          DocuViewareManager.CreateDocuViewareSession(controlConfiguration.SessionId,
            controlConfiguration.ControlId,20);
        }
        else
        {
          thrownewException(
            "Invalid session identifier and/or invalid control identifier.");
        }
      }
Set the service defaults:
using (DocuVieware docuVieware = new DocuVieware(controlConfiguration.SessionId))
    {
       docuVieware.AllowPrint = controlConfiguration.AllowPrint;
       docuVieware.EnablePrintButton = controlConfiguration.EnablePrintButton;
       docuVieware.AllowUpload = controlConfiguration.AllowUpload;
       docuVieware.EnableFileUploadButton = controlConfiguration.EnableFileUploadButton;
       docuVieware.CollapsedSnapIn = controlConfiguration.CollapsedSnapIn;
       docuVieware.ShowAnnotationsSnapIn = controlConfiguration.ShowAnnotationsSnapIn;
       docuVieware.EnableRotateButtons = controlConfiguration.EnableRotateButtons;
       docuVieware.EnableZoomButtons = controlConfiguration.EnableZoomButtons;
       docuVieware.EnablePageViewButtons = controlConfiguration.EnablePageViewButtons;
       docuVieware.EnableMultipleThumbnailSelection = controlConfiguration.EnableMultipleThumbnailSelection;
       docuVieware.EnableMouseModeButtons = controlConfiguration.EnableMouseModeButtons;
       docuVieware.EnableFormFieldsEdition = controlConfiguration.EnableFormFieldsEdition;
       docuVieware.EnableTwainAcquisitionButton = controlConfiguration.EnableTwainAcquisitionButton;
       docuVieware.MaxUploadSize = 36700160; // 35MB
Render the service out to the calling browser as HTMLContent:
using(StringWritercontrolOutput=newStringWriter())
    {
      docuVieware.RenderControl(controlOutput);
      DocuViewareRESTOutputResponseoutput=newDocuViewareRESTOutputResponse
      {
        HtmlContent=controlOutput.ToString()
      };
      returnoutput;
    }
Setting Up and Integrating React
DocuVieware makes it extremely easy to get up and running quickly with React. The only prerequisite is placing specific JavaScript and CSS files onto your system and making sure they can be accessed from the HTML page. The required files are available in the [SDK INSTALL DIR]\Redist\DocuVieware (Resources)\ folder.
The DocuVieware files should be referenced in the <head> section of your main template:
<!– public/index.html –>
<script src=”docuvieware-min.js”></script>
<link rel=”stylesheet” type=”text/css” href=”docuvieware-min.css” >
This demo assumes you’ve already set up the backend so it can be referenced from React:
http://localhost:44355/api/DocuViewareREST/GetDocuViewareControl
We’ll create a React component and service so we can insert the DocuVieware component into the document object model (DOM). We’ll create the service first as this is the part that actually accesses the REST API through a POST request that will return the control mark-up. This is also where you set the control properties you need.
In a nutshell, we’ll create a folder called components, then we’ll create two files in that folder: docuvieware-component.js and docuvieware.api.js.
When we create the component-api class, we first set up a configuration section (config), and declare the display and function options we want to be available to the user:
 exportdefaultclassDocuViewareApi{
 config= {
  SessionId:"mySessionId",//Set to an arbitrary value, should be replaced by the
                         //session identifier from your session mechanism
     ControlId:"DocuVieware1",
  AllowPrint:true,
  EnablePrintButton:true,
  AllowUpload:true,
  EnableFileUploadButton:true,
  CollapsedSnapIn:true,
  ShowAnnotationsSnapIn:true,
  EnableRotateButtons:true,
  EnableZoomButtons:true,
  EnablePageViewButtons:true,
  EnableMultipleThumbnailSelection:true,
  EnableMouseModeButtons:true,
  EnableFormFieldsEdition:true,
  EnableTwainAcquisitionButton:true,
 };
We then declare the call to the server endpoint that will return the DocuVieware control, sending the chosen configuration options in the body of the POST method:
getDocuViewareMarkup = async () => {
    try
    {
       const markup = fetch(
           "https://localhost:44355/api/DocuViewareREST/GetDocuViewareControl",
           {
                 method: "POST",
                 headers: {
                     "Content-Type": "application/json",
                 },
                 body: JSON.stringify(this.config),
           }
         );
         return (await markup).json();
    }
    catch (err)
    {
         return err;
    }
 };
When the result is returned from the server endpoint, it’s rendered dynamically into the DOM:
insertMarkup = (markup, id) => {
     const fragment = document
         .createRange()
         .createContextualFragment(markup["HtmlContent"]);
     document.getElementById(id).appendChild(fragment);
 };
The code of the component-api is in turn called from the main component file:
import React from "react";
import DocuViewareApi from "./docuvieware.api";

 const api = new DocuViewareApi();
 const DocuViewareComponent = () => {
     React.useEffect(() => {
         api
         .getDocuViewareMarkup()
         .then((markup) => api.insertMarkup(markup, "dvContainer"));
 }, []);
     return (
         <div id="dvContainer" style={{ height: "100vh", width: "100%" }}></div>
     );
 };
 export default DocuViewareComponent;
The final step is to include the component we just built into the main front-end application, which is hosted using a NodeJS server:
import React from "react";
import DocuViewareComponent from "./components/docuvieware-component";

function App() {
     return (
     <div className="layout">
         <div>
             <DocuViewareComponent />
         </div>
     </div>
     );
 }
 export default App;
To test that everything is working as it should, we’ll run the .NET API server back end, then run the React application by calling npm start from the root React folder.
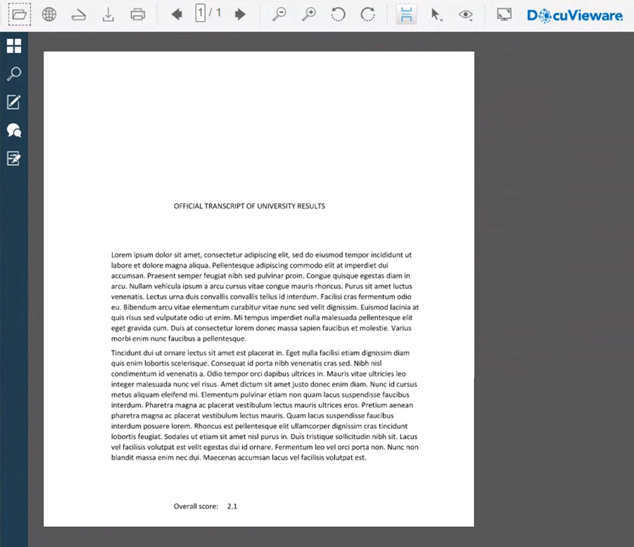
A browser instance should open automatically, and you’ll see the DocuVieware system embedded in the browser, ready to use.
In the example shown below, I’ve already loaded the PDF document we’re going to work with next. As you can see, DocuVieware renders it perfectly, with all of the functions we requested in our React config parameters made available to the user.
Customizing DocuVieware
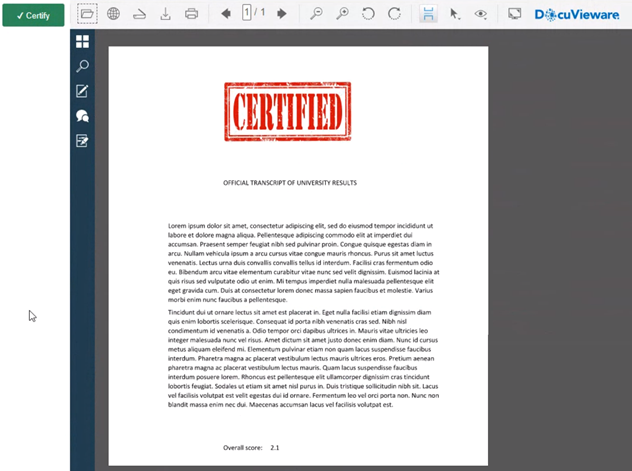
Beyond the extensive built-in functionality the user can harness, you can also customize the user experience in many ways. As an example, we’re going to allow the user to “approve and certify” the university transcript in the example by adding a “certified” image to the document. To do this, we need to add some code to the front-end React app, and some to the server.
First, in the React code, we’ll declare a new function called drawCertify that will call a custom handler we’ll construct on the server. The function will be initiated by a custom button placed on the screen entitled Certify.
import React from "react"; import DocuViewareComponent from "./components/docuvieware-component"; function App() { function drawCertify() { window.DocuViewareAPI.PostCustomServerAction( "DocuVieware1", true, "drawCertify", codeValue ); } return ( <div className="layout"> <div> <button onClick={drawCertify} className="certify"> ✔ Certify </button> </div> <div> <DocuViewareComponent /> </div> </div> ); } export default App;
On the server, we visit the Global.asax and create a CustomActionsDispatcher, which will call a new handler method called DrawCertify:
private void CustomActionsDispatcher(object sender, CustomActionEventArgs e)
{
   if ((e.actionName == "drawCertify") && (e.args != null))
   {
     CustomActions.DrawCertify(e);
   }
}
We then create a new CustomActions class and in it use GDPicture.NET, which is part of the DocuVieware library, to load the PDF, load the “certification” image, and draw the image onto the PDF document in the specified location:
 using System.Drawing;
 using GdPicture14;
 using GdPicture14.WEB;
 namespace DocuViewareREST
 {
     public class CustomActions
     {
         public static void DrawCertify(CustomActionEventArgs e)
         {
             GdPicturePDF oGdPicturePdf;
             GdPictureStatus status = e.docuVieware.GetNativePDF(out oGdPicturePdf);
             oGdPicturePdf.SetOrigin(PdfOrigin.PdfOriginTopLeft);
             oGdPicturePdf.SetMeasurementUnit(PdfMeasurementUnit.PdfMeasurementUnitCentimeter);
             var ImageID = oGdPicturePdf.AddJpegImageFromFile("PATH TO YOUR IMAGE HERE");
             var pageWidth = oGdPicturePdf.GetPageWidth();
             var pageHeight = oGdPicturePdf.GetPageHeight();
             oGdPicturePdf.SetMeasurementUnit(PdfMeasurementUnit.PdfMeasurementUnitPoint);
             oGdPicturePdf.SetOrigin(PdfOrigin.PdfOriginBottomLeft);
             oGdPicturePdf.DrawImage(ImageID, pageWidth / 3, pageHeight / 3,
               pageWidth * 10, pageHeight * 10);
             e.docuVieware.RedrawPage();
          }
      }
 }
The work is carried out on the server, and immediately rendered as required in the browser to the user.
Wrapping Up
In this article we introduced DocuVieware and demonstrated how easy it is to set up and use with the ReactJS front-end framework. We also examined an easy way to add custom functionality to the application by using the postCustomServerAction feature.
As with most integration projects, the most difficult part is simply getting started and learning how the pieces fit together. Hopefully, this article has given you a solid base from which to work when developing with React.
The functionality offered by DocuVieware technology is extremely powerful and allows you to work with multiple file formats in many different ways. You’ll find a number of good resources for learning more on the DocuVieware tutorials page.
For a superb overview of what can be achieved using DocuVieware, take a good look at its online demonstration site.