In This Topic
Tutorials / ASP.NET Web Forms / Custom Snap-In implementation

Custom Snap-In implementation

In This Topic
This tutorial assumes that you have fully followed and understood both Your first DocuVieware ASP.NET page and Client/Server coming and going with Custom Actions tutorials first. If this is not the case, please do it first.
 Overview

Snap-Ins are very powerful interface elements that can be used for various purposes. DocuVieware™ comes with several handy built-in snap-ins such as the Thumbnails, Bookmarks, Text Search or Annotations palette.

This tutorial shows how to create a very simple Custom Snap-In with a button that will trigger a Custom Action server-side to return a message.

You are going to implement a Custom Snap-In that will contain a simple button which action will be to send a "ping" command to the server and it will reply with a "pong" message.

DocuVieware™ requires .NET Framework 4.6 or above.
The screenshots have been taken using Visual Studio and GdPicture.NET™ 14, it may differ from the current release.
 Preparing the Custom Snap-In content

You are going to implement a simple button which action will be to send a "ping" command to the server and it will reply with a "pong" message.

Step 1: Add the custom Snap-In content in the Page_Load code behind (that will be Default.aspx.cs).

You want to do this only when the page is not in a PostBack context.

A custom snap-in is created using the AddCustomSnapIn method that takes several mandatory elements:

  • a name, that's what you will use if you want to select your custom snap-in by code using the SelectSnapIn JavaScript API method
  • a title, that's what is displayed on top of it when it is selected, in other words it is the snap-in label, here it is "Custom Snap-In"
  • an icon, in this tutorial it is a very simple lightning bolt SVG icon
  • a content, that is the HTML content your Snap-In will contain, in this tutorial it is just a simple <div> with a <button> in it
Custom Snap-In content.
Copy Code
protected void Page_Load(object sender, EventArgs e)
{
    if (!IsPostBack)
    {
       using (HtmlGenericControl icon = new HtmlGenericControl("svg"))
       {
          icon.Attributes["viewBox"] = "0 0 16 16";
          icon.Attributes["width"] = "100%";
          icon.Attributes["height"] = "100%";
          icon.InnerHtml = "<path d=\"M6 0l-6 8h6l-4 8 14-10h-8l6-6z\"></path>";
          using (HtmlGenericControl panel = new HtmlGenericControl("div"))
          {
             panel.ClientIDMode = ClientIDMode.Static;
             panel.ID = "customSnapInTutorialPanel" + DocuVieware1.UniqueID;
             using (HtmlGenericControl customSnapInTutorialButtonDiv = new HtmlGenericControl("div"))
             {
                customSnapInTutorialButtonDiv.Style["float"] = "left";
                customSnapInTutorialButtonDiv.Style["margin-top"] = "6px";
                customSnapInTutorialButtonDiv.Style["margin-left"] = "6px";
                using (HtmlGenericControl customSnapInTutorialButton = new HtmlGenericControl("button"))
                {
                   customSnapInTutorialButton.ID = "customSnapInSubmit" + DocuVieware1.UniqueID;
                   customSnapInTutorialButton.Style["height"] = "26px";
                  customSnapInTutorialButton.Style["background-color"] = HexConverter(DocuVieware1.ActiveSelectedColor);
                   customSnapInTutorialButton.InnerHtml = "Ping";
                   customSnapInTutorialButton.Attributes["class"] = "btn-valid";
                   customSnapInTutorialButton.Attributes["onclick"] = "ping(); return false;";
                   customSnapInTutorialButtonDiv.Controls.Add(customSnapInTutorialButton);
                }
                panel.Controls.Add(customSnapInTutorialButtonDiv);
             }
             DocuVieware1.AddCustomSnapIn("customSnapInTutorial", "Custom Snap-In", icon, panel, true);
          }
       }
    }
}

Please note the onclick event on the button, it calls the ping() function but you will implement it later on since it needs to be done client side.

Step 2: Add two more things: the HexConverter utility function and the Custom Action handler that will send the message to the client.

The HexConverter utility function and the Custom Action handler.
Copy Code
private static string HexConverter(Color c)
{
    return "#" + c.R.ToString("X2") + c.G.ToString("X2") + c.B.ToString("X2");
}
public static void HandleCustomSnapInAction(CustomActionEventArgs e)
{
    e.message = new DocuViewareMessage("Pong", icon: DocuViewareMessageIcon.Information);
}

Step 3: Add the custom action event handler in the Global.asax.cs file like this:

The custom action event handler.
Copy Code
private void CustomActionsHandler(object sender, CustomActionEventArgs e)
{
    if ((e.actionName == "ping"))
    {
       Default.HandleCustomSnapInAction(e);
    }
}

Now you are ready to proceed to client side.

 Preparing your Custom Action client side

Not much to do client side besides setting up the JavaScript function that will trigger the custom action you implemented previously.

Add a <script> tag in the <head> section of the page, like this:

Setting up the JavaScript function.
Copy Code
<script>
    function ping() {
       DocuViewareAPI.PostCustomServerAction("DocuVieware1", true, "ping");
    }
</script>

Compile and start the page, the custom Snap-In icon will appear in the left panel.


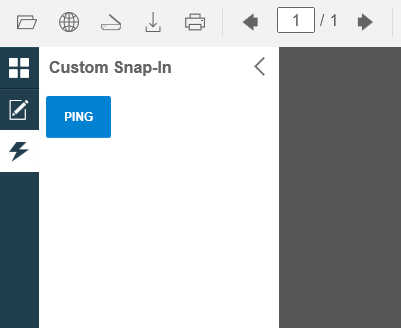
Now, if you select it and click on the ping button, it will trigger the custom action and you should see a "Pong" message coming back from the server.

See Also